Here is this video tutorial you learn how you can fix the color of your Picture using Level's Adjustment Layer..
Sunday, June 28, 2009
Friday, May 22, 2009
Bring Colour and Light out of Ordinary Image
Step 1
Load a photo of your choice into Photoshop. Here is mine..

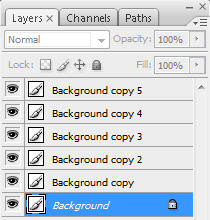
After loading your photo, duplicate the background layer five times:
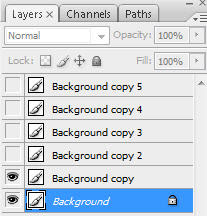
Then hide the top 4 layers and leave just the “Background copy” layer visible.
Step 2
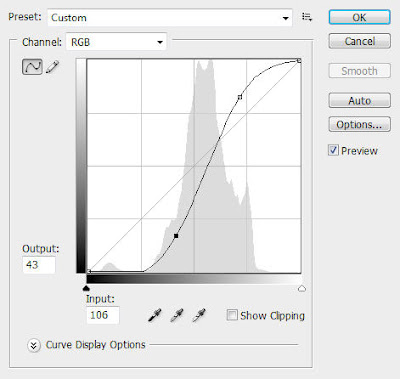
On the “Background copy” layer, hit Ctrl + M to bring up the Curve Tool and apply the following settings:
Then change the blending mode of this layer to “Overlay” with an opacity of 60%, and you will have the following image:

Step 3
Un-hide the “Background copy 2″ layer and select it, hit Ctrl + Alt + Shift key to bring up the Black and White image adjustment tool and apply the following settings:
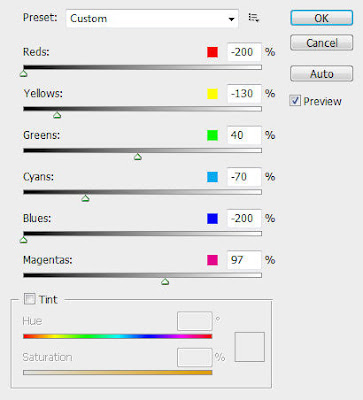
(Please note the settings may be different if you use your own photo, but the idea is to put more emphasis toward certain colours in the image and bring them out a bit more)
Change the layer blending mode to “Soft Light” with an opacity of 70%.
The effect so far will look like this:

Step 4
Now we can some more exposure to the image. Un-hide the “Background Copy 3″ layer and select it, go to Image > Adjustments > Exposure and apply the following settings:
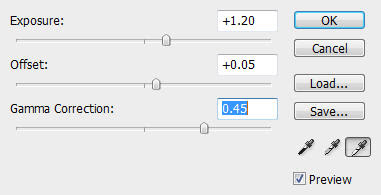
Then change the layer blending mode to “Color” and you will have the following effect:

Step 5
Un-hide the “Background copy 4″ layer and select it, go to Image > Mode > Lab Color and change the image mode to LAB.
The go the Channel Palette and select the “lightness” channel:
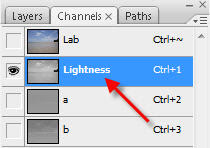
Then hit Ctrl + L to bring up the level adjustment tool, apply the following settings:
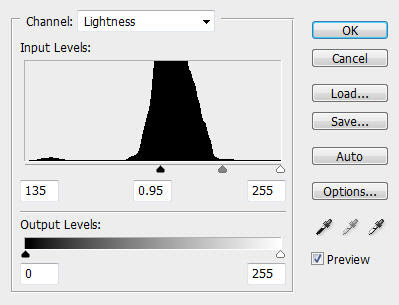
Change the image mode back to RGB mode. When you’re prompted to flatten the image, choose “Don’t Flatten”.
Change to layer blending option to “Soft Light” with an opacity of 50% and you will have the following effect:

Step 6
Now we can add some extra soft light onto the image.
Un-hide “Background layer 5″ and select it, go to Filter > Blur > Surface Blur and apply the following settings:
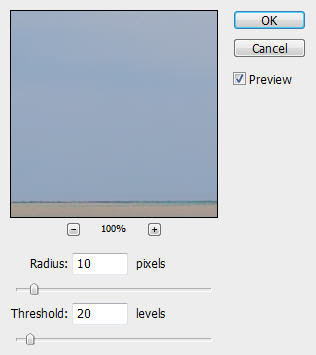
Change the layer blending mode to “Screen” with an opacity of 60% and you will have the following image:

Step 7
This is an optional step. As you can see after several layer blendings, the mountain on the right has become a black spot without any tree to be seen. We can bring the trees back by using the dodge tool.
Duplicate the background layer once more and put the duplicated layer just above the background layer, but beneath any other layer.
Hit “o” key to select the dodge tool, apply the following settings:

Brush over the mountain until the trees are back.
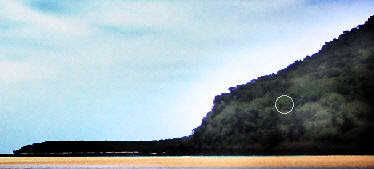
You can reduce the layer opacity a bit to get a better result, also adjust the brush size for the dodge tool if necessary.
And here is the final effect:

Load a photo of your choice into Photoshop. Here is mine..

After loading your photo, duplicate the background layer five times:

Then hide the top 4 layers and leave just the “Background copy” layer visible.

Step 2
On the “Background copy” layer, hit Ctrl + M to bring up the Curve Tool and apply the following settings:

Then change the blending mode of this layer to “Overlay” with an opacity of 60%, and you will have the following image:

Step 3
Un-hide the “Background copy 2″ layer and select it, hit Ctrl + Alt + Shift key to bring up the Black and White image adjustment tool and apply the following settings:

(Please note the settings may be different if you use your own photo, but the idea is to put more emphasis toward certain colours in the image and bring them out a bit more)
Change the layer blending mode to “Soft Light” with an opacity of 70%.
The effect so far will look like this:

Step 4
Now we can some more exposure to the image. Un-hide the “Background Copy 3″ layer and select it, go to Image > Adjustments > Exposure and apply the following settings:

Then change the layer blending mode to “Color” and you will have the following effect:

Step 5
Un-hide the “Background copy 4″ layer and select it, go to Image > Mode > Lab Color and change the image mode to LAB.
The go the Channel Palette and select the “lightness” channel:

Then hit Ctrl + L to bring up the level adjustment tool, apply the following settings:

Change the image mode back to RGB mode. When you’re prompted to flatten the image, choose “Don’t Flatten”.
Change to layer blending option to “Soft Light” with an opacity of 50% and you will have the following effect:

Step 6
Now we can add some extra soft light onto the image.
Un-hide “Background layer 5″ and select it, go to Filter > Blur > Surface Blur and apply the following settings:

Change the layer blending mode to “Screen” with an opacity of 60% and you will have the following image:

Step 7
This is an optional step. As you can see after several layer blendings, the mountain on the right has become a black spot without any tree to be seen. We can bring the trees back by using the dodge tool.
Duplicate the background layer once more and put the duplicated layer just above the background layer, but beneath any other layer.
Hit “o” key to select the dodge tool, apply the following settings:

Brush over the mountain until the trees are back.

You can reduce the layer opacity a bit to get a better result, also adjust the brush size for the dodge tool if necessary.
And here is the final effect:

Ok that’s it for this tutorial! Remember you can always use the layer blending modes, curve/level tools and blur filter to bring out light and contrast for your image.
Cheers and have a nice day!
Many Thanks to www.psdvault.com
Friday, May 15, 2009
Photo To Line Drawing
This Video will show how to turn a photo into a drawing and adding a lil jazz to the image.
Sunday, May 3, 2009
Photoshop professional retouching techniques
Today I will walk you through some easy techniques that will help you bring a photo to life. We will perform some basic and natural retouching and learn some new techniques along the way. In this tutorial I am using Photoshop CS 3 (for PC).
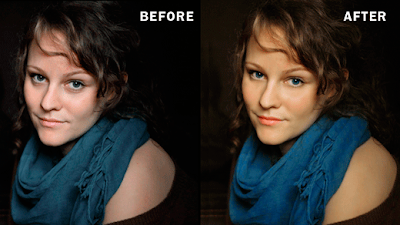
Step 1
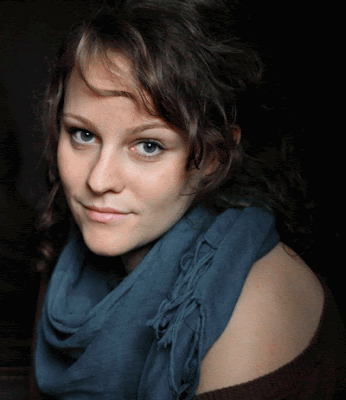
Open up the photo and use the crop tool to leave out the free space from the left that we don’t need.
Step 2
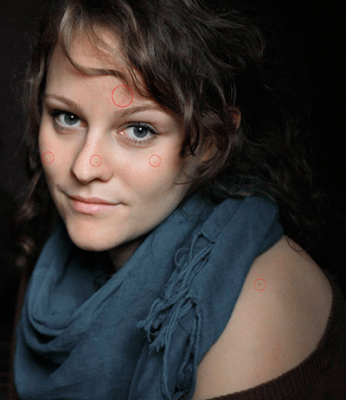
Now we are ready to start retouching the photo .We always start with the skin. So let’s smooth out the little imperfections. The Spot Healing Brush is perfect for that. Just select it and click on the problem areas.
Step 3
Use the the Clone Stamp tool for the wrinkles located under the eyes. Hit 3 on the keyboard so that you are using a 30% opacity and make sure the effect is subtle. We don’t want to go to far.
Step 4
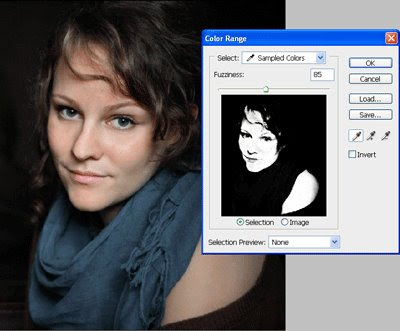
And now for the smoothing of the skin we will use Color Range. Go to Select/Color Range and click on any area of the skin , keep the Shift key pressed to continue adding tones until you have something similar to this. A fuzziness of 85 is OK for this case.
Step 5
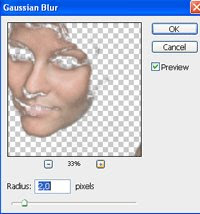
With the skin selected click Ctrl + J to copy the selection on its own new layer. Go to Filters/Blur/Gaussian Blur and give it a 2.0 Radius. Click OK.
So we’re done with the skin. And that was the trickiest part because it requires a lot of attention. Good job!
Step 6
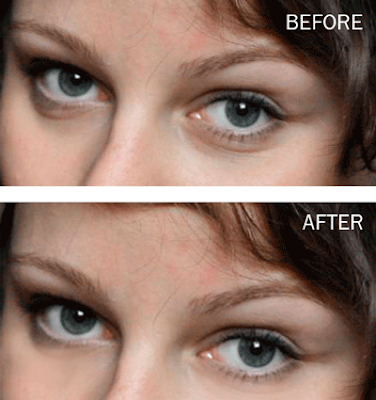
Create a new layer and set the mode to Overlay and zoom in on the eyes. Using white as your foreground color, choose a soft brush with an 8 px size and brush on the light areas of the eyes. Reduce the opacity of the Layer to about 20 %.
Step 7
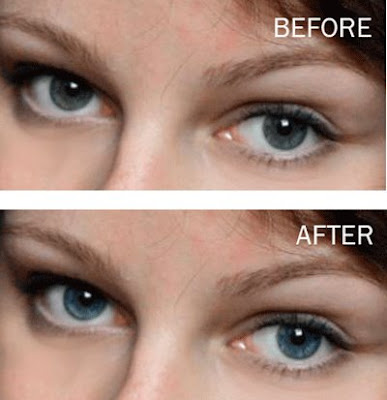
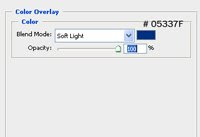
Let’s bring some color into the eyes. There are many ways to do that but today we will use color overlay . So make sure the overlay layer is selected go to layer styles and use the following settings:
Step 8
Create another layer. Change its mode to Soft Light choose Black as your color and brush again on the eyes , but this time focus on the darker areas.
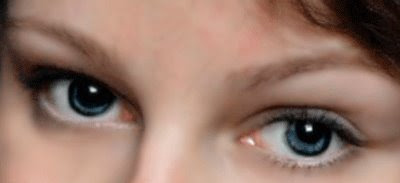
Reduce the opacity of this layer to 20 %.
As you may have noticed the effects we used are very subtle . You always have to be careful when retouching a photo and make sure you use subtle effects to avoid an artificial look.
Step 9
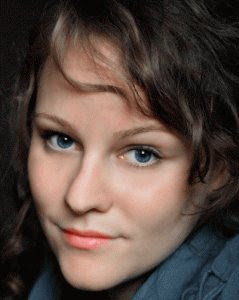
Create a new layer on top of all the others. Change the mode to Soft Light. Choose a peach color for the lips (I’ve used # b35046) and paint on the lips with a soft brush. Reduce the opacity to 75 %.
Step 10
Use the same color but with a substantially larger brush to paint on the cheeks to give them a little color. Make sure you do this on a different layer with a Soft Light mode.
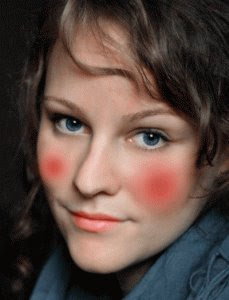
Lower the opacity to 15%.
Step 11
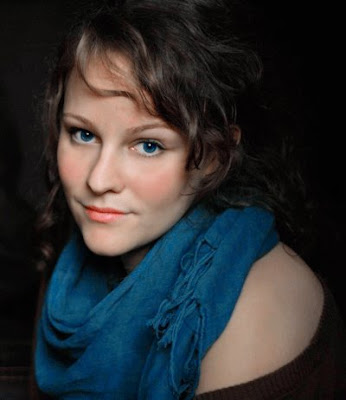
Before the final touches let’s make the shawl around the girl’s neck more appropriate with the whole picture. This is a good chance to learn a new and very useful technique. This will make your retouching job much easier. So just create a new hue and saturation adjustment layer.
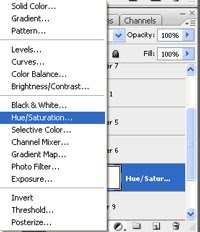
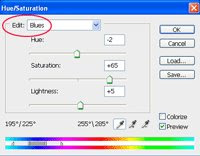
From the Edit Menu choose Blues and push the saturation to 65. You see how the color just pops, and we are only affecting the blue tones in our photos, as simple as that.
Step 12
And now we are ready for the final touches.
Create a new adjustment layer on top of all the other… but this time choose Curves. We want to bring a little more red tones and yellows to the skin, to complete our natural look.
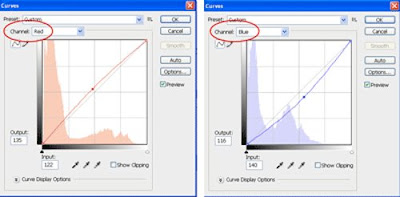
So on your Curves Menu first choose the red channel and bring the curve up a little perform the following settings.
Next, pick the blue channel and bring the curve down for some yellow tones. You can play around with the settings.
Search for the effect that better suites you. The Curves Adjustment Layer offers you infinite possibilities.
And you are about done! Hope you’ve find it useful and I’ll see you next time.
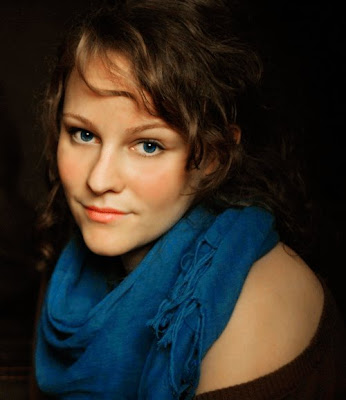
Many Thanks to designioustimes.com

Step 1
Open up the photo and use the crop tool to leave out the free space from the left that we don’t need.

Step 2
Now we are ready to start retouching the photo .We always start with the skin. So let’s smooth out the little imperfections. The Spot Healing Brush is perfect for that. Just select it and click on the problem areas.

Step 3
Use the the Clone Stamp tool for the wrinkles located under the eyes. Hit 3 on the keyboard so that you are using a 30% opacity and make sure the effect is subtle. We don’t want to go to far.

Step 4
And now for the smoothing of the skin we will use Color Range. Go to Select/Color Range and click on any area of the skin , keep the Shift key pressed to continue adding tones until you have something similar to this. A fuzziness of 85 is OK for this case.

Step 5
With the skin selected click Ctrl + J to copy the selection on its own new layer. Go to Filters/Blur/Gaussian Blur and give it a 2.0 Radius. Click OK.

So we’re done with the skin. And that was the trickiest part because it requires a lot of attention. Good job!
Step 6
Create a new layer and set the mode to Overlay and zoom in on the eyes. Using white as your foreground color, choose a soft brush with an 8 px size and brush on the light areas of the eyes. Reduce the opacity of the Layer to about 20 %.

Step 7
Let’s bring some color into the eyes. There are many ways to do that but today we will use color overlay . So make sure the overlay layer is selected go to layer styles and use the following settings:

Step 8
Create another layer. Change its mode to Soft Light choose Black as your color and brush again on the eyes , but this time focus on the darker areas.

Reduce the opacity of this layer to 20 %.
As you may have noticed the effects we used are very subtle . You always have to be careful when retouching a photo and make sure you use subtle effects to avoid an artificial look.
Step 9
Create a new layer on top of all the others. Change the mode to Soft Light. Choose a peach color for the lips (I’ve used # b35046) and paint on the lips with a soft brush. Reduce the opacity to 75 %.

Step 10
Use the same color but with a substantially larger brush to paint on the cheeks to give them a little color. Make sure you do this on a different layer with a Soft Light mode.

Lower the opacity to 15%.
Step 11
Before the final touches let’s make the shawl around the girl’s neck more appropriate with the whole picture. This is a good chance to learn a new and very useful technique. This will make your retouching job much easier. So just create a new hue and saturation adjustment layer.

From the Edit Menu choose Blues and push the saturation to 65. You see how the color just pops, and we are only affecting the blue tones in our photos, as simple as that.


Step 12
And now we are ready for the final touches.
Create a new adjustment layer on top of all the other… but this time choose Curves. We want to bring a little more red tones and yellows to the skin, to complete our natural look.

So on your Curves Menu first choose the red channel and bring the curve up a little perform the following settings.
Next, pick the blue channel and bring the curve down for some yellow tones. You can play around with the settings.
Search for the effect that better suites you. The Curves Adjustment Layer offers you infinite possibilities.
And you are about done! Hope you’ve find it useful and I’ll see you next time.

Many Thanks to designioustimes.com
Friday, April 10, 2009
Diffusion Glow Effect for your Pictures
Here i will show you how you make Diffusion Glow Effect on your own Pictures and look beautifull.
Step 1: First open any image.
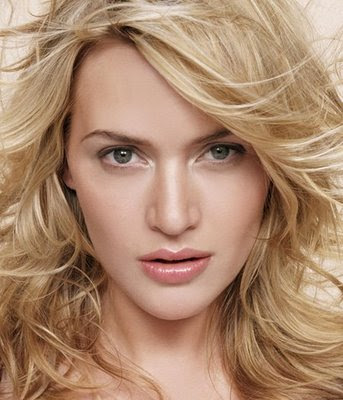
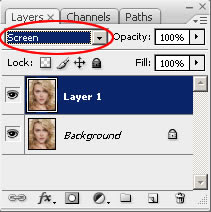
Step 2: Duplicate the layer, go to Layer> Duplicate or press Ctrl+J and change the blending mode of the new layer to Screen.
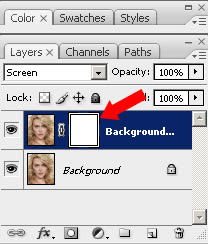
Step 3: Now add a layer mask to the top layer so go to Layer> Add Layer Mask> Reveal All.
Step 4: Make sure the layer mask is activated. The thumbnail of the layer mask in the layer window should have a white border around it. If it does not, click on the thumbnail to activate the layer mask.
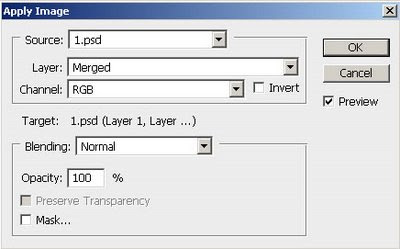
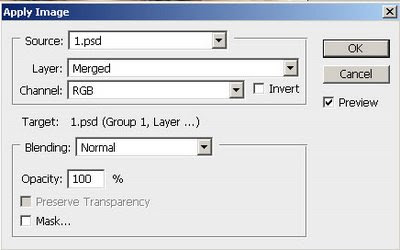
Step 5: With the layer mask activated, go to Image> Apply Image and use these settings:
Your Image looks like:
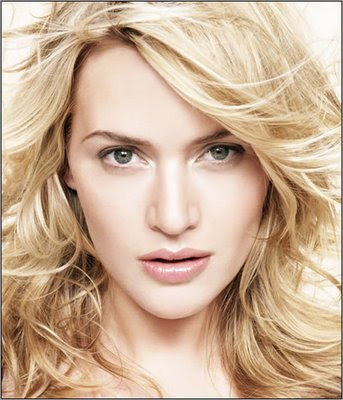
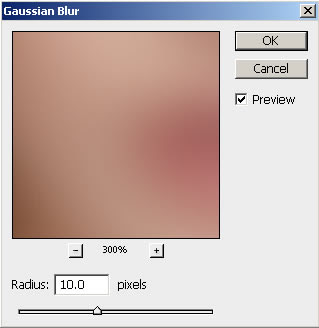
Step 6: Click on the thumbnail of the top layer to deactivate the layer mask. With the top layer selected, go to Filter> Blur> Gaussian Blur. Make sure that the preview checkbox is checked and increase the radius slider until the desired effect is achieved.
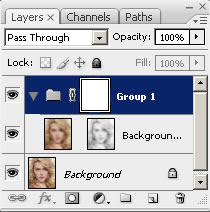
Step 7: We need to add another layer mask but Photoshop will only allow one raster layer mask per layer. To get around this, we will simply group the layer so go to Layer> Group Layers or press Ctrl+G and add a layer mask go to Layer> Layer Mask> Reveal All, to the new group created.
Step 8: Click on the thumbnail of the new layer mask. With the layer mask selected, use the Apply Image so go to Image> Apply Image tool to apply the entire image to the layer mask and apply these settings:
Here's is the Final Result!:
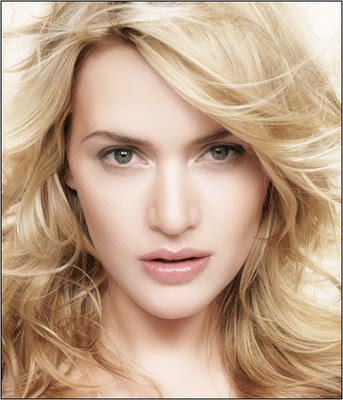
Step 1: First open any image.

Step 2: Duplicate the layer, go to Layer> Duplicate or press Ctrl+J and change the blending mode of the new layer to Screen.

Step 3: Now add a layer mask to the top layer so go to Layer> Add Layer Mask> Reveal All.
Step 4: Make sure the layer mask is activated. The thumbnail of the layer mask in the layer window should have a white border around it. If it does not, click on the thumbnail to activate the layer mask.

Step 5: With the layer mask activated, go to Image> Apply Image and use these settings:

Your Image looks like:

Step 6: Click on the thumbnail of the top layer to deactivate the layer mask. With the top layer selected, go to Filter> Blur> Gaussian Blur. Make sure that the preview checkbox is checked and increase the radius slider until the desired effect is achieved.

Step 7: We need to add another layer mask but Photoshop will only allow one raster layer mask per layer. To get around this, we will simply group the layer so go to Layer> Group Layers or press Ctrl+G and add a layer mask go to Layer> Layer Mask> Reveal All, to the new group created.

Step 8: Click on the thumbnail of the new layer mask. With the layer mask selected, use the Apply Image so go to Image> Apply Image tool to apply the entire image to the layer mask and apply these settings:

Here's is the Final Result!:

Wednesday, April 1, 2009
Photo Negative Effect
Here's a quick and easy way to convert your photographs in photo negative effect.
Step 1: First open any image in photoshop.
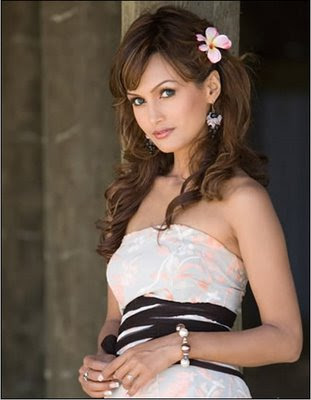
Step 2: Go to Image> Adjustment> Invert or press Ctrl + I.
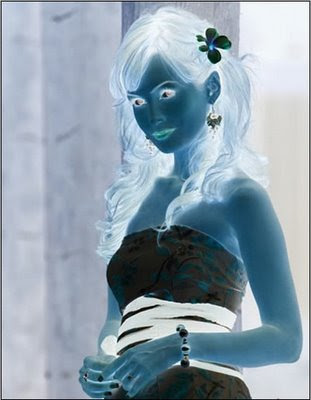
Step 3: Go to Image> Adjustment> Desaturate or press Ctrl+Shift+U.
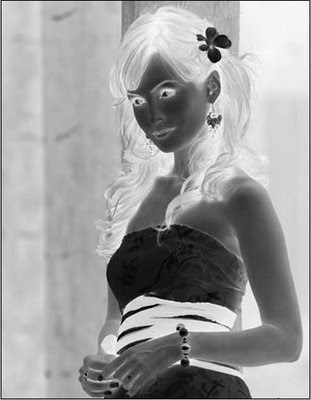
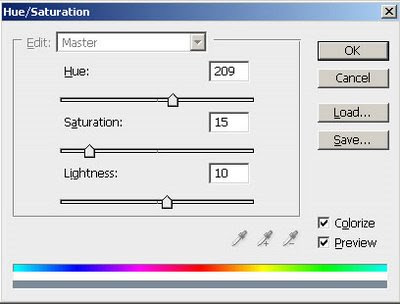
Step 4: Go to Image> Adjustment> Hue/Saturation or press Ctrl+U and apply these settings:
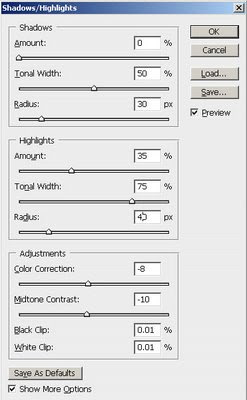
Step 5: In the final step go to Image> Adjustment> Shadows/Highlights and apply these settings:
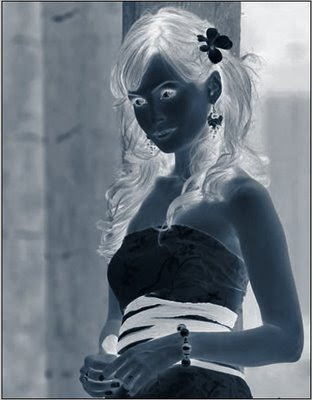
Here's is the Final Result!:
Step 1: First open any image in photoshop.

Step 2: Go to Image> Adjustment> Invert or press Ctrl + I.

Step 3: Go to Image> Adjustment> Desaturate or press Ctrl+Shift+U.

Step 4: Go to Image> Adjustment> Hue/Saturation or press Ctrl+U and apply these settings:

Step 5: In the final step go to Image> Adjustment> Shadows/Highlights and apply these settings:

Here's is the Final Result!:

Monday, March 16, 2009
Make a photo more contrastive
Make a photo more contrastive
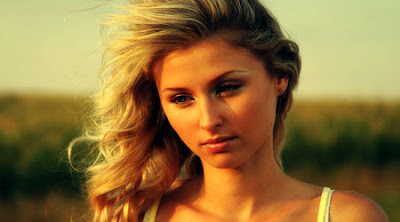
This tutorial will show you how to turn a normal image into a contrastive one!
Step 1: First download the original photo below:
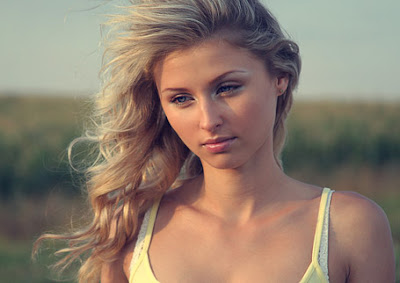
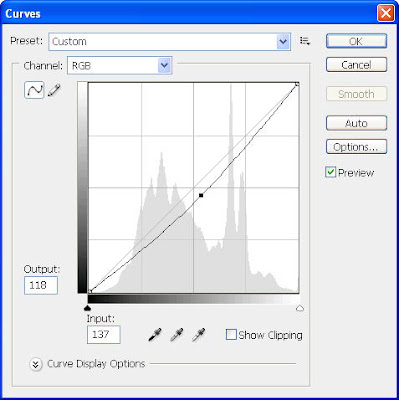
Step 2: Next we use some popular tools to adjust its contrast and brightness like Curves tool (Image>Adjustments>Curves)
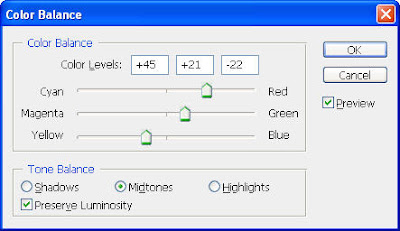
and Color Balance (Image>Adjustments>Color Balance) with these settings:
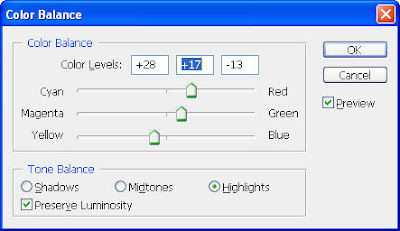
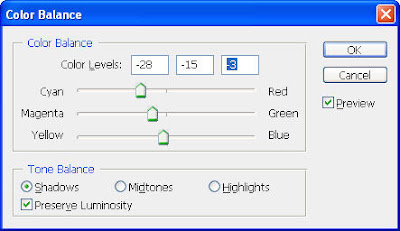
Our photo now looks like this:
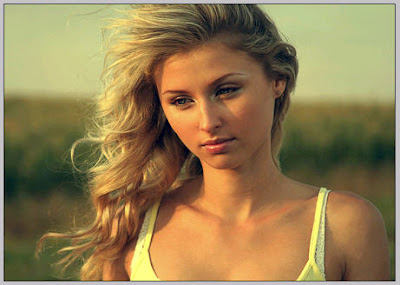
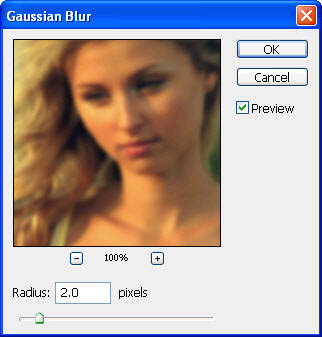
Step 3:Duplicate your photo (Ctrl-J) and go to File>Blur>Gaussian Blur and choose a radius of 2 pixels to blur this layer a bit
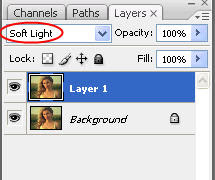
Step 4: Then from the Layers tab, change the blending mode of this layer to Soft Light
And your photo will become more contrastive like the photo below:
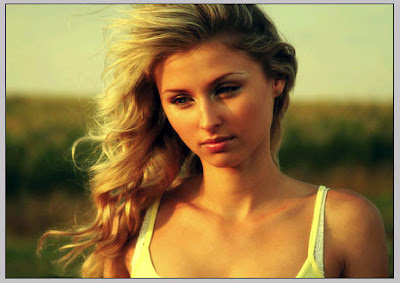
This method is commonly used to emphasize something you want on a photo by making it more contrastive with the background. The model now looks lovely and lively!

This tutorial will show you how to turn a normal image into a contrastive one!
Step 1: First download the original photo below:

Step 2: Next we use some popular tools to adjust its contrast and brightness like Curves tool (Image>Adjustments>Curves)

and Color Balance (Image>Adjustments>Color Balance) with these settings:


Our photo now looks like this:

Step 3:Duplicate your photo (Ctrl-J) and go to File>Blur>Gaussian Blur and choose a radius of 2 pixels to blur this layer a bit

Step 4: Then from the Layers tab, change the blending mode of this layer to Soft Light

And your photo will become more contrastive like the photo below:

This method is commonly used to emphasize something you want on a photo by making it more contrastive with the background. The model now looks lovely and lively!
Subscribe to:
Posts (Atom)